DIY Chandelier
Happy Monday! Did you all have a great weekend? I was busy finishing my One Room Challenge, a series where a group of bloggers make over a room in 6 weeks, posting weekly updates. It sounds easy, but for this patient bargain hunter, it really forced me to make design decisions quickly, which is not something I’m used to. However, there’s no better motivation to finish a room fast when the clock is ticking!
Now that my One Room Challenge makeover is revealed, I’m finally back in my DIY groove and have some fun projects to share with you over the next couple months! Think lots of plaid, some feathers and jewelry. I’m expanding my DIY skills and dabbling into fashion so that’s been a fun challenge.
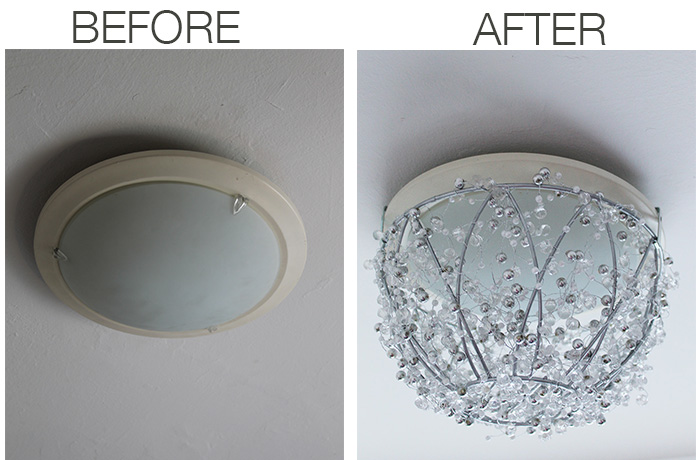
Today’s project originated when I was trying to come up with DIY light fixtures ideas for the One Room Challenge. I was working with an ugly light and I wasn’t about to rewire a whole new fixture with existing wires that are frayed, dating back to 1906 when the house was built.
I know when to leave it to the experts, if you know what I mean.
So I brainstormed ideas that would camouflage the light without rewiring and voila! A win win for everyone.
This is especially great for renters if you can’t (or won’t) update fixtures, but you want something a little prettier than the standard light fixture.
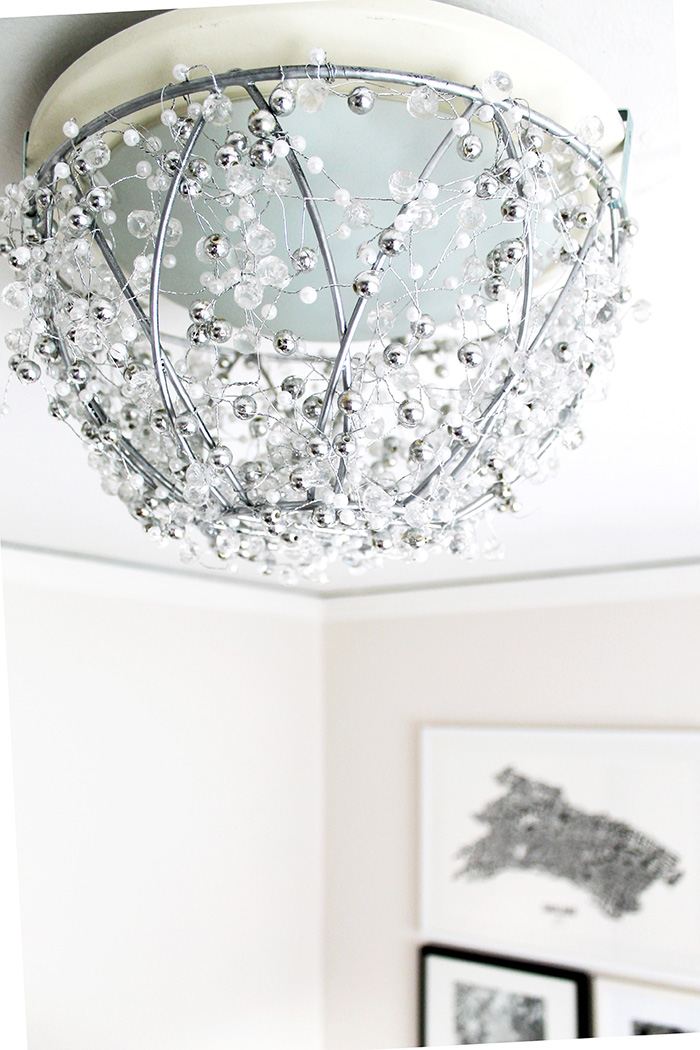
I used a hanging plant basket and some crystal wire garlands from the holiday decor aisle in the craft store to create my own DIY chandelier light fixture! Trust me, it looks way more complicated than it actually is.
If you can wrap wire around a basket with no rhyme or reason, you can do this DIY 😉
Here’s how I made it:
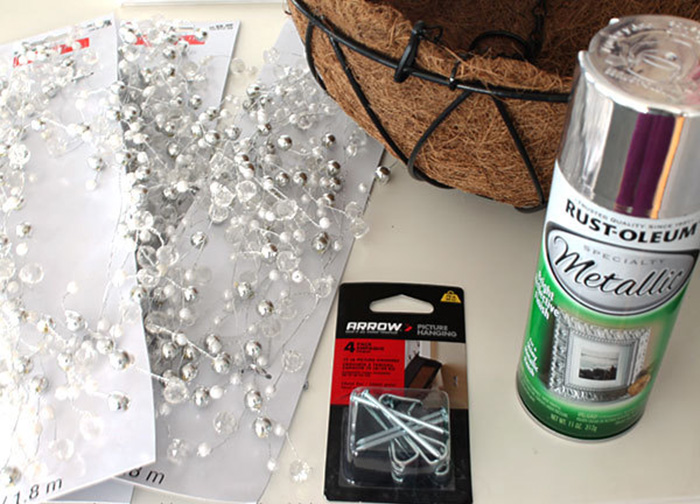
Materials:
12-inch-diameter hanging wire planter basket (adjust the basket size if your fixture is smaller or larger)
crystal garland, I used 4 6-foot strings of garland for a total of 24 feet
Step 1.
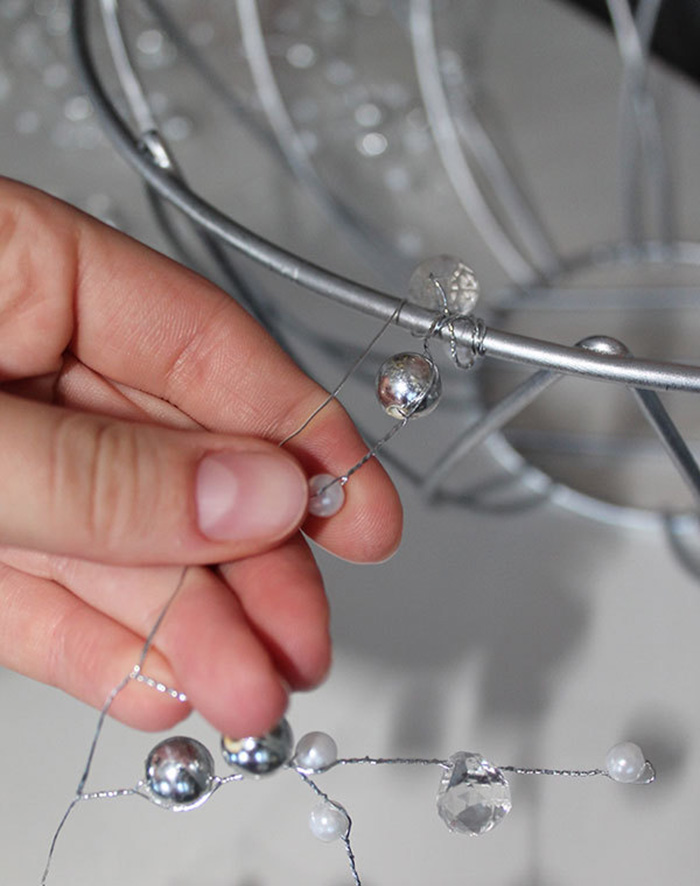
Remove the hanging chains and coconut filler from the plant basket, and spray-paint it silver. While the paint is drying, lay out the garlands so you’re ready to work. Once the paint is dry, take the end of a garland strand, and wrap it around the top edge of the basket, securing it in place. Because the garland is wire, you can easily bend it so it stays put.
Step 2.
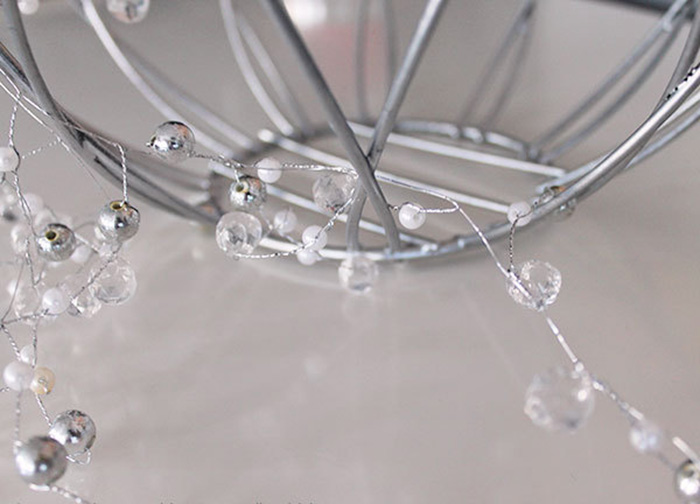
Using the same garland, weave it through the basket, going over and under the basket wires. If your garland is made of fine wire as mine was, chances are it will tangle easily, so don’t fight it too much and just let it cluster. The goal is to fill the gaps between the basket wires. I found it easier to not worry about weaving it in a certain pattern and just let the wires fill the spaces. I worked in sections, going around the basket.
Step 3.
Continue with step 2 until the basket is completely covered with all the garlands, with no gaping holes. The garland wire bends easily so you can tuck pieces away and move them around to fill holes.
Step 4.
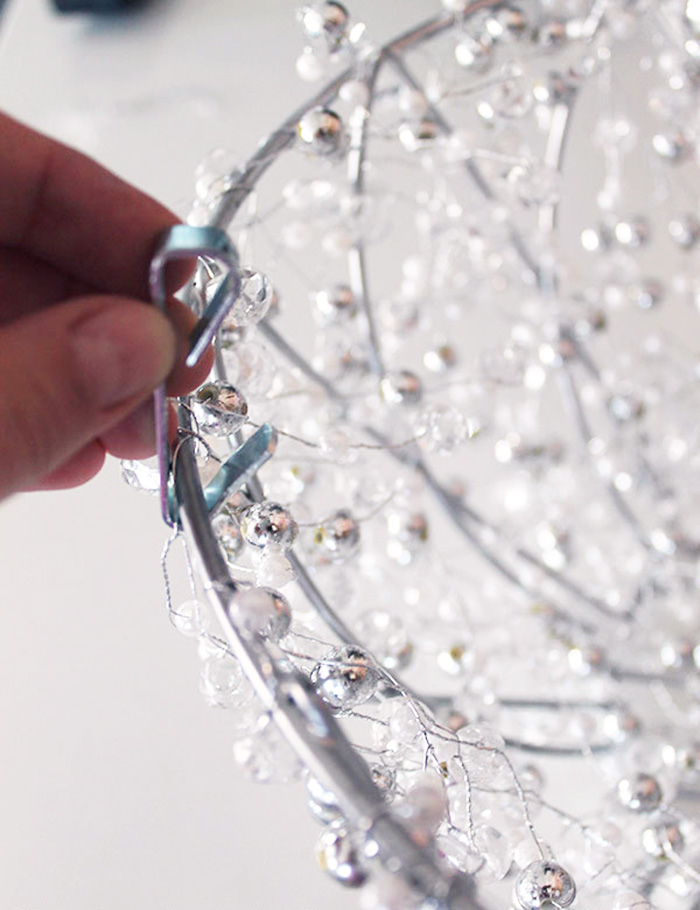
Once you’ve finished stringing the garlands, you’re ready to hang your new chandelier. Take three hooks, and attach them to the top rim of the basket. Hook the other ends around the lip of the light fixture. You could also experiment with paper clips if you can’t find the same clips that I used.
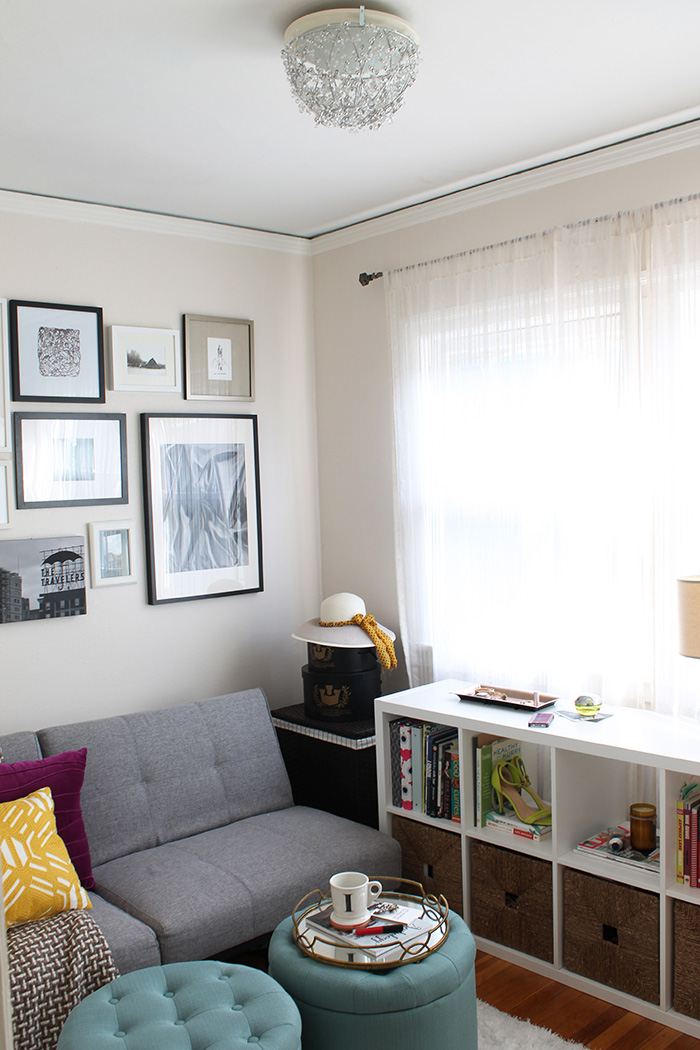
For more photos of the chandelier in action and to see the final reveal of my One Room Challenge guest room makeover, click here.
Fantastic DIY project! Love it!!Just wanted to let you know I can’t read the yellow hyperlinks at all. I have a little eye trouble, do I feel I’m missing some of what you are saying.
Found this on Pinterest and now looking forward to seeing more from you!
Thank you so much for giving your feedback on the hyperlinks. I questioned it when I redesigned my blog a couple months ago. Will be changing it now 🙂 Thanks!
Hola ..de chile saludo.me encanta todo hermoso
This is a great DIY for renters! So many projects require that you own your house. And this is a great time to be looking for those wire baskets. The retail world thinks it’s Spring! (Dollar Tree here I come, because I have several light fixtures that this would improve!)
You’re right! It’s also great for those that aren’t so handy with electrical wire (me!). Be sure to send me photos of your newly updated light fixtures! I can’t wait to see 🙂
omg; i absolutely love this!!! i would love to see how the light hits those clear beads once it’s actually on… & i actually work at joann’s craft & fabric, so when these items go on clearance, i’m going to try this!!just out of curiosity, i know you said that you wrapped the garland around, did you use any spray adhesive of any sort, or did you take advantage of the spray paint being tacky to adhere the garland to the basket? or did you just wrap it and that’s it?
Thank you! Honestly, the light doesn’t reflect off the beads too much, so there isn’t a dramatic look like a real chandelier. Great question about the adhesive! I should have mentioned that the garlands I used were wire, so I could bend them into place I wrapped them around the basket. No glue was needed! Let me know if you have any more questions 🙂
about halfway thru (didn’t buy enough garland)… Looking pretty cool.. The hanging of the hooks looks a little tricky (made an attempt). Did you bend the top part of the hangers to fit flat over the light fixture?
How exciting!! Hopefully the store has more garlands you can grab. The hanging hooks I actually found in Target (they were meant for something else I think) and worked perfectly so I didn’t have to bend or change them at all! Let me know if you still have questions about the hangers and I’m happy to help.
Love this idea for a modern looking chandelier! Very creative use of the wire basket. I will share on my blog as the jewelry makers should come and visit!
Thanks for sharing, Pearl!
This is gorgeous!
Thank you!!
Just found your site through Pinterest. Yes, us renters need all the help we can get. Thanks for the information on where you find your equipment. I have several “challenging” renters problems, including a couple of your wonderful flush mounted ceiling lights to conquer. Any solutions for an ugly, old-fashioned ceiling fan combo?
Welcome, so glad you’re here! I have a couple ceiling fan combos I’m still trying to tackle, but no clever DIY solution yet!
Just love your clever idea’s………brilliant
Thank you so much, Carolyn!
Wooow! This is beautiful!
Hola dese Caracas Venezuela, esta increíble haré uno para mi baño, te doy 100% de calificación por tan fantástico diy
I don’t read English very well but I understood all what you said. Thank you : it’s a very good idea….
I’d love to see it with the light switched on!
Beautiful and so clever
this is brilliant really!
Where did you get the 12″basket? All I can find is 14″.
I just bought one at Big Lots
omg this looks fabulous, thank you a great tutorial, have to try this one for sure.Should i be concerned with the bulb heating up the wires and beads when leave the light on for a long time?
The wires and beads aren’t directly touching the light bulb so I haven’t noticed them getting too warm.
Beautiful! Genius idea, I need to try this 🙂
Absolutely Amazing. Cant wait to do this in my daughters room. She has an 80s dome light and needs some bling!)May I ask where you got the lights? I have only seen stings with 1 style bulb. I love the look yours lent to the light.
Kind thanks!
She will love it! I didn’t use any string lights on this project, they are actually bead garlands with a variety of beads strung around the wire basket. Let me know if you have more questions!
Thanks for sharing this idea, I can’t believe I can make a chandelier like yours.It’s gorgeous.
Be sure to send me a photo of your finished chandelier! Have fun 🙂
Just wanted to say what a great idea this is, and so pretty too! Thanks for sharing this with us.
I just the idea of covering an ugly light fixtures. So cool. Where did you get the string garland? I am dying to try this. Thanks for ideas.
I got my string garland at Michaels, but you can also order them on Amazon. Here is one I found that is very close to the one I used http://amzn.to/1X8Qg4B
I just love this light cover!!! It is so lovely and delicate. I don’t have a ceiling light in my apt but i am buying all the supplies and then see if I can be creative. Thank you again. Your directions are so easy. Beautiful!!!!
Thank you so much, Karen! I think you could definitely hang this up without a light. Can’t wait to see your finished product 🙂
This is so clever! I have an idea to adapt it to fit a ceiling rose and flex fitting by adding a lampshade fitment to the wire basket. However I’m worried it could be a fire hazard. What do you think?
Hi Sandra, if I’m understanding correctly, as long as the lampshade isn’t sitting directly on the lightbulb and it’s set up similar to how an actual lampshade sits on a lamp, it should be safe. Send a pic of your project – I’d love to see it!
what craft store did you find the garland in? It is so fabulous, attempting to create myself but havn’t been able to find the strands. thank you for the great idea
I got my garland at Michael’s, but I found very similar on Amazon here https://www.amazon.com/Beaded-Garland-Pkg-Clear-Aurora-Borealis/dp/B0074K4DJI/ref=sr_1_1?s=lawn-garden&ie=UTF8&qid=1456002105&sr=8-1&keywords=beaded+wire+garland&tag=rewardstyle-20&ascsubtag=W7N58FBJqJ-n-bjhnhmb5m97–1269464345
I loved the look of the modified boobs light. I always hated the cheap brass trim. I couldn’t find the Garland but I did find crystals connected by very soon metal circles. I connected the crystals + reinforced then with hot glue. I wish I could send a picture of how beautiful my Chandelier looks. You can find it on my Facebook page Jane Charley. Because of the difficulty in attaching the little wire rings I swore I’d never make another one all the neighbors have asked me to it’s definitely not the expense. Thank you again for sharing this wonderful idea
So happy you were able to make your own and even come up with your own personal twist! A little update like that makes all the difference 🙂 Checking out your Facebook page now to find your chandelier.
I just found this and I think it’s brilliant! I’m headed over to the craft store as soon as they open. It’s going into my bathroom. Thank you so much for sharing your great idea.