How to Design a Room From Start to Finish: Our Master Bedroom Plan

I’m back with a One Room Challenge update! For a refresher, two weeks ago I shared my first post where I revealed master bedroom project. Here are all the before photos so you can see what it looked like right after we moved in a few weeks ago 🙂
Last week was the second week of the challenge, but I actually skipped the week since we were in Hawaii, so I didn’t have any new updates on our room. It just means we have a lot to cram in the remaining 3 weeks of the challenge!
Since we renovated our previous house and with countless projects in every room, I’ve developed a process for how I design a room from start to finish in 8 easy steps and figured I’d share it with you!
It can be overwhelming. There’s a lot to think about when decorating one room, let alone a whole house. Then, you want to make sure your house flows from room to room and feels cohesive, which is another challenge in and of itself. And with about 10 rooms in our new home, we are nowhere close to done planning or decorating, but we have started with our master bedroom plan first.
In this post I’ve broken down the details on how to design a room interior from start to finish. If you ever feel lost in your own home planning, I hope this is helpful!
How to Design a Room From Start to Finish
1. Gather Inspiration
Every project starts with ideas and inspiration. If you’ve ever tried to start a project aimlessly without getting clear on your end goal of how you want it to look, you’ve likely felt overwhelmed with where to start and unhappy with the end result. I’ve been there myself, too. Which is why taking the time to gather and sift through ideas is so important! There are just too many ideas out there with a million possible directions. So you must be clear upfront what you want, so you can begin looking for inspiration that fits that. Otherwise you will go in circles with all the possibilities. Also something I’ve done in the past.
I wrote about the whole process for finding your style here you can read. Today, I will break it down simply. Identify 3 adjectives that you want to be able to use to describe your home and remember them. It could be cozy, welcoming, and airy; or colorful, fun, and fresh; or rustic, neutral, and simple.
Just think about how you want your dream home to look and feel and come up with 3 words that best describe it. Those are your words. Stick to ‘em! They will be your guiding direction as you plan out your entire room in the following steps. As you’re looking for inspiration you can often find yourself getting side tracked when you see a pretty pin and suddenly veer off from the direction you were going. You can certainly like a picture and think it’s pretty, but they don’t ALL fall under the 3 adjectives you chose for your home. Admire the picture and move on, but don’t let it veer you off track.
When I was looking for inspo for our master bedroom, I kept coming back to the words, light, comfortable, and neutral. That can mean a little something different to everyone, but as long as you know what it means to YOU, that’s all that matters.
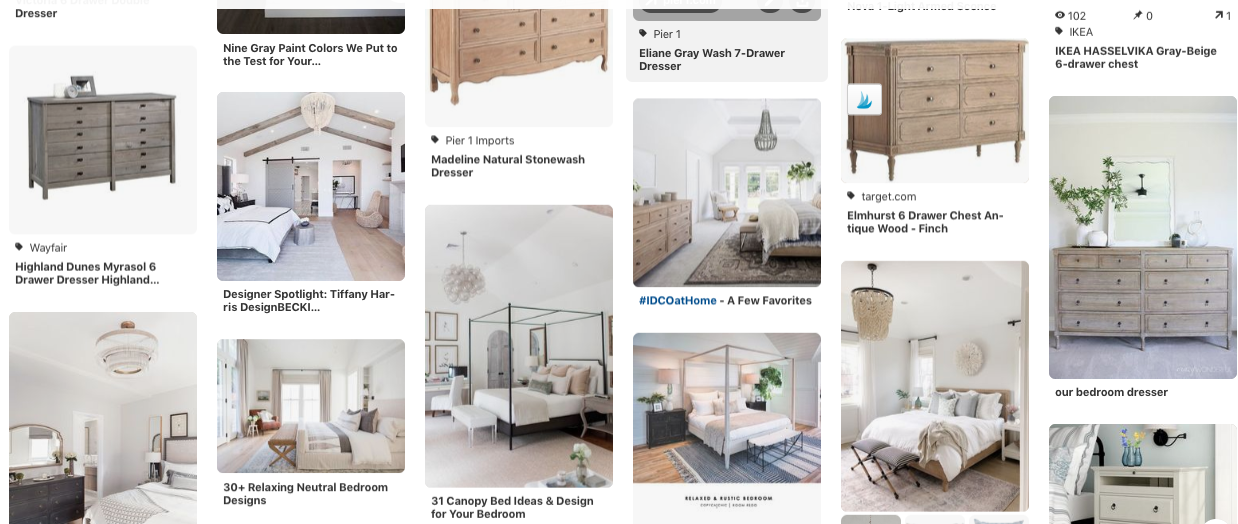

Start an inspiration board on Pinterest and when you find pictures of rooms that convey the 3 adjectives you picked, pin it to your board. I have a huge Pinterest board going for all the ideas for our new house. Anytime I see a pin or item I love and want to remember, I pin it to our new home board. That way I can always reference it if I’m feeling stuck or just need a refresher if I’m feeling like I’m getting off track from my original goals for our bedroom.
You can never have too many pins, as long as you’re being picky and only pinning the ones that you can actually envision you and your family living in and it checks all 3 of your adjectives. You can create a separate board for each room in your house, but I like to have everything on one board, and then you can organize the board by room using sections. Aim to have at least 25 pins on your board to give you a good feel for your inspiration and your vision.


2. How Does the Room Need to Function
First and foremost, your room should function for your family’s needs. If something’s bothering you or there’s a way to make it better, write it down. Maybe you could use some more storage in your room, so you want to look for dual purpose furniture that serves as seating and storage. Or maybe you love your wood coffee table, but you want something with softer edges that’s more comfortable to put your feet up on, so an ottoman rather than a wood coffee table is a more functional piece for that specific space. Think about how you use the space day to day and what things could make your routine easier. I know for me, a bedside table on each side of the bed with lamps is important to us so either of us can read at night and set our water bottle next to us at night. Another thing as simple as hanging hooks in our room to hang a robe or towel rather than draping it on the bed goes a long way in just making our day to simpler and better. Keep in mind also who uses the space and what’s most practical for your family.
3. Write a Wish List
Make a list of all the things you can think of you want in your room. Even if some seem far-fetched or not “must haves”, write them down anyway! Then, prioritize the list from most important to least important and talk it over with your spouse to decide what what you both need in order to be happy. Once you have your list prioritized, use it as a starting point to set your budget. Looking at your most important items on the list, you can see what a reasonable cost will be to spend on your room design, and then how much extra you need for some of the lesser important items farther down on the list. This will give you a good idea what’s realistic to spend.
If you aren’t sure what something costs, do a little research to find out so you have a rough estimate. Oftentimes you don’t realize how much something is until you get into it. If you think $500 is enough for a bedroom makeover, but once you start making your list and do some research on how much beds costs, you realize a new bed alone eat up your entire budget. Familiarize yourself with the costs of things on your list so you know what to really expect.
The most expensive item on our list is a new dresser. I want a larger dresser to fill the wall, but also to hold both our clothes. After doing some shopping around for dressers, I’ve found that an average price I can expect to pay is around $500 for a quality, wood dresser that should last for years.
4. Plan Out Your Layout
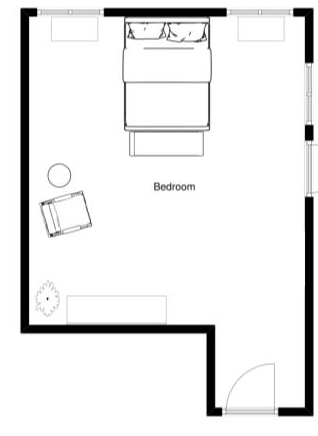
I’m a super visual person so I like to see the layout and plant out how the furniture will be arranged. I use Floorplanner for this which is a free room design app available online. You take measurements of your room and plug them in to create your virtual room, then you add in furniture, window treatments, rugs, lighting and other items to get a digital feel for how your layout will look.
The most important thing you can do is measure each piece of furniture you have for your room or plan on buying so that everything fits in your room appropriately. In the past there were times I didn’t measure furniture before I bought it and then when I brought it in the room, it didn’t fit and I’m in a pickle. If there is a piece of furniture you’re considering online or in-store, get the dimensions and then tape it out in your room so you can see how much space it would take. I do this for everything from furniture to art to decor.
Taking measurements was super important when I was shopping for nightstands. I knew I wanted the bed along the back wall, but it’s not a huge space, so I need to make sure the bed and 2 nightstands can fit along the wall with enough room so it’s not too tight.
Sketching out a general floor plan on a sheet of paper works too if you don’t want to go the digital route – I’ve also done that before. Whatever method works best for you to create a floor plan so you can plan out the furniture layout so it fits in the space and doesn’t feel too crammed.

5. Set Your Budget
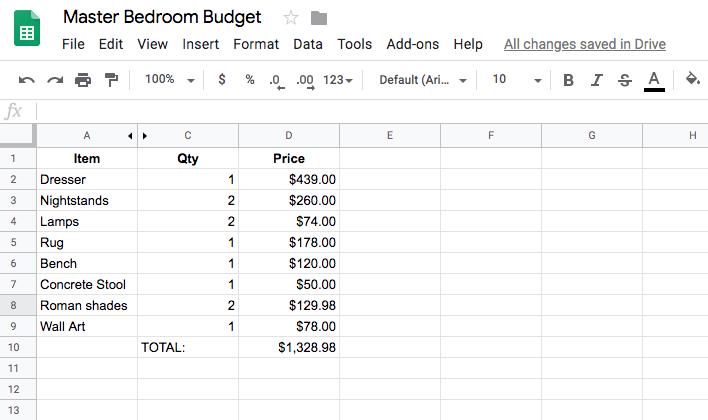
Itemize your budget down to the penny with every last little thing you need for the project based on the list you created in step 3. Don’t forget small items like nails, paint brushes, or caulk. Try to add in about a 10% buffer just in case. In our experience, projects always cost a little more than we originally thought, so if you can plan for some wiggle room, do it.
I recently started keeping a spreadsheet for each room or project we tackle so everything is organized in one place and we can keep track of how much we spend and if we’re on track.
If you don’t have the budget to do everything on your list right away, break it up into phases so they are spread out. For example, as I’m working on our master bedroom, we have our initial plan, but that doesn’t include installing new floors or a king size bed. Those will come at a later time, but we’ll get the rest of the room done now. We do not take on debt for projects, so we save each month and once we have enough, we can start the project. Just set your budget and stick to it.

6. Pick Your Paint Colors
You have your inspiration board full of pins and your 3 adjectives. Now you should have a pretty good idea of how you want your room to look and feel. Your inspiration board should have a bunch of ideas you want to do in your room and you should have a good vision of the floor plan and what exactly it’s going to look like. If you’re still feeling lost, go back to your inspiration board and find some more pins that really speak to you and that convey the same look and feel you want in your home.
When I looked at all the pins on my inspiration board, I analyzed the paint colors I saw in each pin and which images I particularly liked the colors best. I knew I wanted our master bedroom to feel light (remember, it was one of my adjectives) bright and calming yet comfortable and cozy. Most of my pins had very light, neutral colors on the walls so that’s what I’m doing in our master bedroom too. I did some research to see which white paint colors were most popular and what their different undertones were. In this post I go in depth talking about undertones and why they are important when choosing a paint color. For our master, I wanted to keep the undertones warm so our space felt cozy, but not overly yellow. Kylie M Interiors blog is a wealth of knowledge about paint and she does color reviews which are super helpful so you can see the colors in real spaces and she explains the undertones and everything.
I decided on Accessible Beige by Sherwin Williams as the winning pick for our walls! Our trim will be Pure White by Sherwin Williams. Another great white but not too stark white. Just make sure to always try a sample of the paint color on your walls and look at it at different times of day. You don’t want to repaint a wall because you don’t like the color you chose before testing it.
7. Go Shopping
It’s time to get shopping and sourcing all the pieces from your wish list you need for your room. Online shopping is my preference because there’s a much wider selection than my local home stores. Plus, I can shop while in my leggings sitting on the couch which is always a win in my book.
What I do is start by looking at a few of my go-to online retailers for furniture or whatever it is I’m shopping for to see if they have what I want. It’s usually a combination of searching on Pinterest, Google, and going to all the home retailers, hunting for exactly what I need.
For example, our bedroom dresser. I knew I wanted a dresser that was longer than the current one we have to fit more clothes. I had a general idea of the greige-ish color I was looking for and knew I wanted it made out of wood that was at least 60 inches long to fit the wall it would sit against. My search started on Pinterest where I saw lots of cute options on Pier1, but they cost more than I wanted to spend. I googled grey wood dressers but wasn’t finding any I loved in my price range, so then I looked at Nebraska Furniture Mart online where I actually found one that checked all the boxes. It’s on backorder so I’m hoping it will be come in time, but I may need to keep looking for another option that’s in stock.
It’s important to note this is an ongoing process that takes lots and lots of time. I’m super picky because I don’t want to get any old piece I stumble on. I want it to be the right size (remember those measurements so it fits your space) color and, overall I have to love it. This keeps me from buying spur of the moment and then regretting it later because it’s not exactly what I wanted.
I spend hours shopping for pieces over the course of a few weeks. Start by looking for your big pieces of furniture first. Then work your way down to the smaller pieces and finish with accessories and art. I started with looking for nightstands and a dresser. Those are the biggest pieces of furniture I need. Then I found a rug, window shades, and art. Accessories are the final layer in a room so typically I like to wait until everything else is in the room, then I can play around with accessories and see if I can use what I already have before deciding if I need to buy something specific.
As I’m shopping, if I come across a piece I like, I pin it to my inspiration board that holds all our new home ideas. This way I can keep track of my options and compare easily. Hold off on buying things just yet, there’s one last step before I decide to purchase. Keep shopping until you’ve found everything on your list.
8. Design a Mood Board
This is where the vision inside your head comes to life! Spill all of the furniture, decor, lighting, window treatments, rug, accessories, art, and anything else you shopped for onto a blank canvas on your computer to visualize how it all looks together. This is your chance to change things up if you don’t love it before you commit and buy each piece. It’s kind of like a trial run to make sure the colors and fabric and materials all match. You can use anything from Photoshop to Canva to a Word doc to create a mood board. Whatever works for you. I personally use Photoshop to create my mood boards. Just create a collage of all your pieces and see how it looks. I love being able to see the whole picture and I’m so excited to see our master come to life!
If you’re satisfied with your mood board and your room design, you can go ahead and start buying pieces!
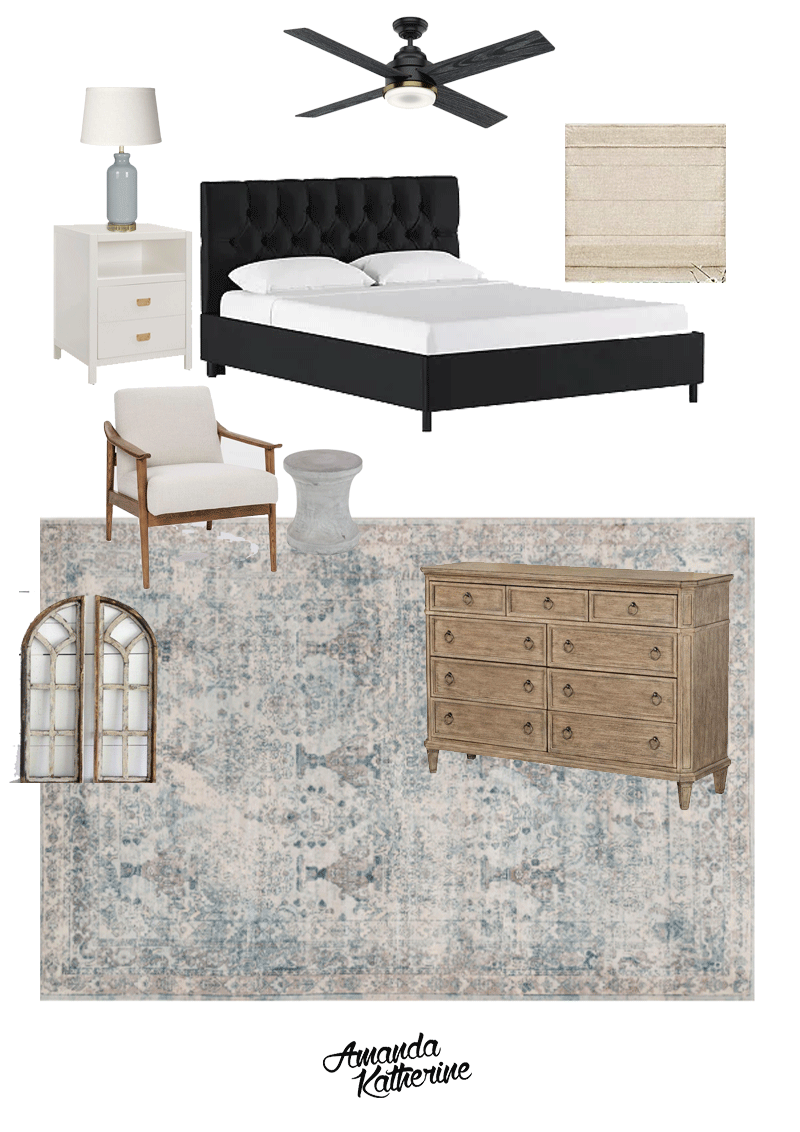

So far I have painted our walls and trim, bought the nightstands and lamps, got the new ceiling fan, and I’m using the accent chair we already have. I’m just waiting to completely decide on art and accessories until the dresser and rug come in.
Next week I plan I’ll share more progress pictures of our room with the new paint and hopefully have the furniture delivered!
That’s my process for how to design a room from start to finish as I share our complete master bedroom plan. It’s a lot, but the process has become streamlined and so natural that I don’t even have to think about it. It’s helped me be more intentional and overall much happier with the outcome of every room because it’s more thought out. There’s a lot less regrets and returning things because I took the time to plan it out the first time around. I hope this breakdown was helpful and you learned a thing or two!
We like to set deadlines or use events we have coming up to motivate us to finish the project, like this one room challenge in 6 weeks. Does it add to the stress? Absolutely 😉
Do you like to follow a process as you decorate, or are you more a go with the flow and see what happens person?
I’ll see you back here next week with more progress. Make sure to check out all the amazing designers and other guest participants in the One Room Challenge! There’s a huge variety in rooms and styles so it’s fun to see everyone’s ideas and how they’re decorating their space.